Object Chooser
Xpresso, Tips & Tricks, Textures – by: base80
March 1st, 2007
This tutorial covers how to create User-Data menus and how to use a Link-List node.
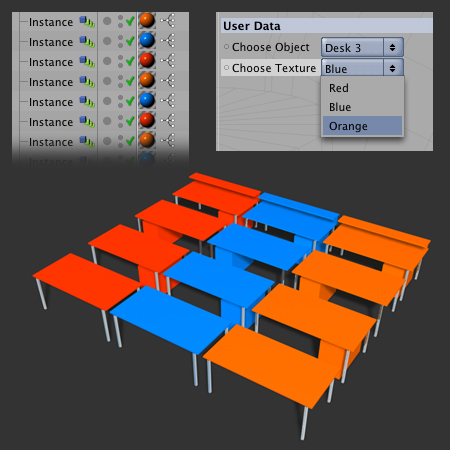
The result is an xpresso on an instance where you can choose a desk type and a color.

Follow up:
The Model and Setup
Lets start wit an empty Null named “Objects”.
In this Null we add 4 more Nulls named “Object 1…4”
In those 4 Nulls we put our models, in my case 4 types of office desks.
Now we add an Instance object without “reference”
Add an Xpresso Tag to the instance object.
What we want to do is that the empty Instance becomes one of the Objects (1>4)
So lets start by adding a User-Data on the Instance (not on the xpresso tag)
We are going to create the pull-down menu here.

Give the User-Data a nice name (Object Chooser)
Set the type to Integer
And then start typing the values, these will become a menu.
The values are composed of a numbering, a “;” and a name.
The numbering starts with 0
The menu will NOT work without the “;“.
So this is what I typed:
0; Desk 1
1; Desk 2L
2; Desk 2R
3; Desk 3
You can name the items as you wish.
The Xpresso
Open the xpresso editor and drag the Instance in it twice(2x)
In the first Instance node you will open the User-Data out-port named “Object Chooser”.
In the second Instance you will open the “reference” in-port.
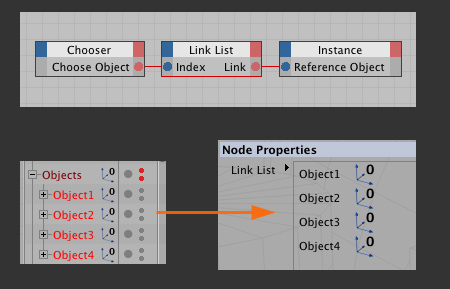
Between the two instance nodes we need a Link-List node.

Click on the Link-List node and look at the object manager. You will see an empty little window waiting for objects.
Drag the 4 Object Nulls from you hierarchy in this window. Be careful to have them in the right order.
Well this is it. If all went well your user-data menu will choose one of the objects as a reference for the instance.
Because this is the first tutorial about the Link-List node I will push the tutorial a little bit further.
I want to choose a color for the desk.
So we add a new user-data menu with 3 colors;
0;Red
1;Blue
3;Orange
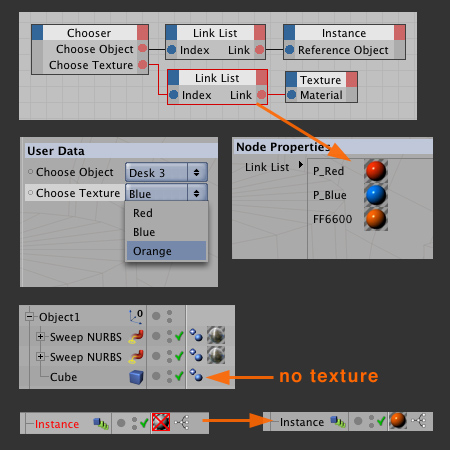
In the xpresso editor we start by opening the user data port on the first instance.
Connect it to a new Link-List node and this time we drag three textures in this node in the right order.
We have to add a Texture Tag on the instance in our hierarchy, this tag will show a red cross on it.
Drag the texture tag into the xpresso editor and link the second Link List node to its ‘Material” in-port.

The texture will be applied only on objects not having a texture.
If all went well you can choose the desk type and its color.
Now here is a neat thing, you can make as many copies of the instance as you wish.

