
Mow the Lawn: Hair+Proximal+Tracer
Procedural, Hair, MoGraph – by: base80
July 22nd, 2008
Sorry for the long absence… But here is a new tutorial about Cinema4d.
This time of year we have to mow the lawn. Maxon has a great tutorial about that, but I wanted to go a bit further.
This setup mows the grass with a dynamic spline. So there is no pre-determined path.
We’ll be using Hair and Mograph’s Tracer to accomplish the following effect.
Follow up:
Lets get started by getting to know Mograph’s Tracer object. This is becoming one of my favorite tools in Mograph.
The tracer can do several things, like connecting a bunch of objects, witch I will not cover here. I’ll just show 3 examples of how to use the tracer to mow a lawn.
First example shows how to Trace a spline following the movement of a Null object.
Lets assume you have an animated null (attached to a character or any other object)
Select the null and add a Tracer object from the Mograph menu.
The tracer will automatically draw a spline following the selected Null. Great.
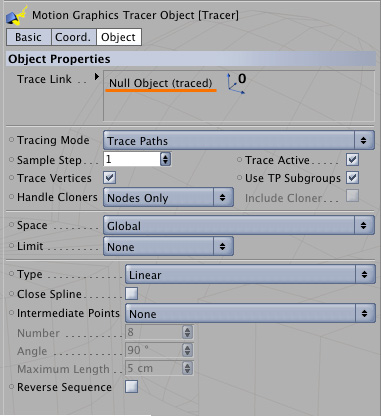
If you did not select the null before adding the Tracer you will have to drag it in the “Trace Link” field by hand.
There are no other settings to make to the tracer at this point.
I’ll give 2 other possibilities of Tracer at the end of this tutorial once the whole setup is done.
So what we have now is a spline that is dynamically generated from a movement of a Null. What we want is this spline to do something for us.
In this case: Mow the lawn. (Yes honey I’ll do that right now, just finishing this tutorial)
Ok lets make a lawn. See the complete tutorial for more details: Grass & Flowers with Hair
Add a plane to the scene, select it and hit the “Add Hair” item in the Hair menu.
Ok, that is our lawn.
If you want a more fancy effect, select “Fur” from the Hair menu, with the plane selected, and set the length to 1/4 of that of the Hair. (This will be the hight of the cut grass)
Now go the the Hair texture, this is where it all gets done.
Check the “Length” box and set the “Texture” to the “Proximal” effect.
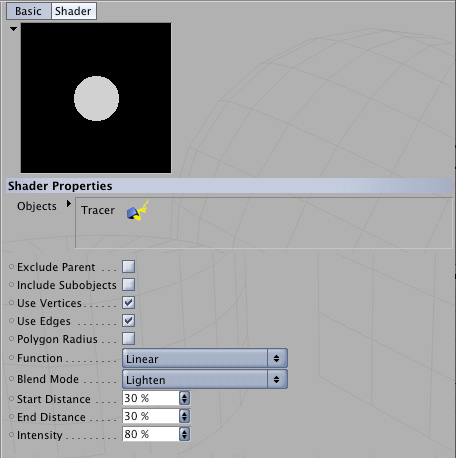
This will open the settings of the Proximal effect like in the image above.
To make the proximal work you have to drag the Tracer in the Object field.
Then there a 3 setting:
– Start and End Distance –> this is the with of the mowing area, you will have to play with this setting.
– Intensity –> this is the hight of the cut grass.
Now ensure the tracer has traced a spline above your plane with hairs before you do a test render.
If you render the scene now you will notice that the proximal grows the hair instead of cutting it.
To avoid this we have to invert the effect of the Proximal. I did this by putting the proximal in a “Filter” shader.
In this filter you can invert the proximal by checking “Clipping” and by reversing the High Clip and the Low Clip sliders, like so:
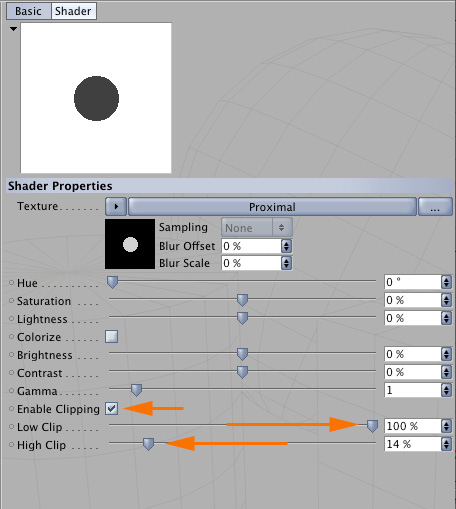
Re-render your scene and if all went well the grass is shorter along the Tracer-spline.
I made a more detailed tutorial about the proximal and hair here

Why all the fuss about dynamic splines. Well as the tools in cinema4d become more and more dynamic there are a lot of cases where the path of an object can not be determined in advance.
The Tracer helps us to get the spline or path of any animated object.
In the example below the Tracer follows particles, and the particles cut the grass.
This is done with the same setup for the Hair but with the tracer set on the emiter object.
And here the Tracer follows a Dynamic Spline:
There is probably a lot more you can do with this combination of modules I didn’t cover here. But I hope this gives a good start to your animation setup.
Enjoy!
Edit: Here is an image showing the different settings of the proximal shader
