Camera Match on Object
PhotoMatch V.2 – by: base80
April 26th, 2006
Here is a tutorial about extracting a textured object from a picture. You will need the PhotoMatch plugin to do this.

Follow up:
I assume you know PhotoMatch before starting this tutorial.
So you already know how to calibrate a camera to a picture.
So I started with this picture. And I did the PhotoMatch calibration.

I placed a cube at the centre of the scene with the same dimensions as the Transformer-station and matched the camera to position accordingly.

As you know PhotoMatch creates a texture of the picture. Drag that texture to the cube.
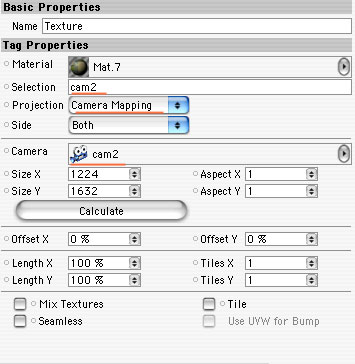
Then choose “Camera Mapping” and drag the camera into the camera field.

Miracle! The texture is attached to the cube. Try moving around the cube and the picture stays at the right place. (don’t move with the PhotoMatch camera)
Now this is very nice, camera mapping is just great, it uses a camera to project a texture.
But the back side of the cube is not covered by the texture.
So what I did is to make a null object at 0.0.0 and I placed a copy of the camera in it. Then I rotated the null by H.180 degree. It will put the camera at the opposite end of the cube.
Make a copy of the texture tag on the cube and map it to the just created second camera. This will project the same picture at the back of the cube.
At this point you will have to convert the cube in polygons and select the polygons “seen” by the first camera and make a selection-tag. Do the same for the opposite polygons seen by the other cam.
In the texture tags you have to name the selection tags the textures have to be restricted to.
According to my plan the cube should be textured at all 4 sides. And the object can be animated in space.

Here is an example of a building matched on some cubes.

